
An Intro to Minecraft Mods
Code your first mod with Java and the Fabric API

I've never played Minecraft for more than a few minutes, but my son loves it. He's expressed an interest in coding and recently said he wants to code a Minecraft mod.
I started looking into what was involved in coding a mod for Minecraft, and found it to be more involved than I was expecting.
I figured there had to be others in the same boat, so I decided to document what I learned along the way.
Hope this helps!
What are we covering?
installing Java
enabling mods in Minecraft
Minecraft servers
setting up VS Code for Java development
making a basic mod with Fabric
testing our mod in single-player mode
installing a mod on a server
troubleshooting
theory
What do I need?
Once you start poking around online, it's easy to get overwhelmed with all of the resources on the topic of Minecraft mods.
There are multiple versions of Minecraft, multiple releases of those versions, multiple programming languages that can be used for mod development, and multiple modding frameworks within those language options.
There's also a lot of outdated information, as well as information that only relates to older versions of Minecraft. I want to be able to make mods for the newest version of Minecraft, and so that's what I outline in this blog post.
Minecraft Java Edition
The Java Edition of Minecraft is synonymous with the "computer version" of Minecraft. If you have Minecraft installed on Windows, MacOS, or some desktop variation of Linux, then you have the Java Edition.
In other words, you need a computer that has Minecraft installed. This is the computer that you'll be using to develop the mod.
A Minecraft server
We get into the role of a Minecraft server later in this blog post, and in even more detail in Running a Minecraft Server. For now, just think of a Minecraft server as a place for mods to live.
If you're not planning on playing multiplayer, then you don't need to worry about this step much, since the only server you'll need is a development server (which comes bundled with the Fabric framework).
If you want to learn more about servers, check out Running a Minecraft Server.
A programming language
At the top of this section, I mentioned that Minecraft can be modified with multiple programming languages. Depending on where you're looking, you might come across resources for:
Java
Python
JavaScript
I initially wanted to use JavaScript because that's what I'm most familiar with. But, after some experimentation and research, I decided JavaScript was not worth it for this use case.
Why? Because it adds a layer of complexity. Even if you're coding the mod in JavaScript (or TypeScript), it's getting converted to Java at the end of the day. So while it might be a more ergonomic experience to use JavaScript, the setup and dependency overhead feels less than ideal to me.
To keep things as simple and direct as possible, we're going to code the mod with Java.
A way to modify Minecraft
Now we start to get a bit more technical. We know we need a server to house the mods, but how do we make the mods?
For that, we need something that hooks into the existing Minecraft code and allows us to make changes. Modifying the Minecraft code directly doesn't seem like a great idea. After all, we could (and probably would) break something.
Thankfully, some smart people worked through this problem and came up with the idea of a modification framework. Frameworks provide a safer and easier way to make modifications when compared to modifying source code directly.
We get into the details later in this blog post. For now, the important thing to know is that frameworks package your mod into a .jar file, which lives on your Minecraft server (or within your local installation of Minecraft).
.jar files also provide modularity -- each mod exists in its own .jar file. If you decide you don't want a certain mod anymore, its .jar file can simply be deleted from the server.
For Java, there are two frameworks to choose from:
Forge
Fabric
I will briefly compare the two, then explain why I chose Fabric.
Forge
Forge is the original framework, and the more powerful of the two. As such, it can handle more drastic modifications compared to Fabric. Additionally, Forge is better at handling "interop", meaning it's easier for mods to "talk to" other mods.
This all sounds great, but it comes with some tradeoffs:
Because it is more powerful and flexible, that also makes it more demanding of your machine's resources. If your machine isn't built for performance, it may not be able to handle Forge.
Forge's power and flexibility come at the cost of a larger, more complex codebase. More complexity and more code mean longer release cycles -- much longer. In fact, many mods created with Forge are still out-of-date because updating them to comply with new Minecraft versions simply takes too long.
Fabric
Fabric was created out of the need for a more lightweight, performant, and maintainable framework. It can be used on a standard laptop, and mods built with Fabric can be kept up-to-date as a result of Fabric's lighter footprint.
Of course, tradeoffs work both ways. Because it is more lightweight, the modification capabilities are not as robust as those of Forge, and so the "interop" of Fabric mods suffers; this means it's harder for Fabric mods to talk to each other when compared to Forge.
I decided to use Fabric because:
I will sometimes be working "on the go", so I need to be able to develop the mod with my standard laptop
I don't need to make complex mods that work together
I want to work with the latest version of Minecraft
If you decide Forge is better for what you need, I wish you the best of luck. The rest of this guide will focus on Fabric.
Setup
You probably already have Minecraft installed on your computer, so the next step is to give Minecraft the ability to "run" mods.
It seems that there is a lot of outdated content on this topic, and more recent releases of Minecraft (1.19.4 at the time of this writing) have different setup and configuration instructions when compared to the older releases.
Thankfully, Fabric has a wiki.
Fabric Launcher (Client)
Per the wiki, we first need to install the Fabric launcher. Before that, though -- we should address what exactly the Fabric Launcher is. You can think of the Fabric Launcher as a special installation of Minecraft that allows mods to be loaded into the game. If you've ever installed a different version of Minecraft under the 'Installations' tab, it's very similar to that.
As a prerequisite, we need to make sure Java 17 is installed on the computer that Minecraft Java Edition is installed. You most likely have Minecraft installed on Windows or MacOS, but if you have it installed on Linux, you might need some additional instructions, as the Linux instructions on the wiki don't cover certain edge cases.
It's also worth noting that the commands in Linux CLI instructions are for older versions of Minecraft. If you copy the command from these instructions, it will install Java 8 (we need Java 16+). For more detailed instructions on installing Java on Linux via the CLI, see Installing Java on Ubuntu.
I'm on Windows, so I follow the appropriate instructions to verify my Java Installation.
Following the instructions, I check my Java installation in the Windows Command Prompt:
java -version # press enter

# output
java version "19.0.2" 2023-01-17
Java(TM) SE Runtime Environment (build 19.0.2+7-44)
Java HotSpot(TM) 64-Bit Server VM (build 19.0.2+7-44, mixed mode, sharing)
I see a couple of issues:
The Java version is 19 and not 17
I have the JRE (Java Runtime Environment), but not the JDK (Java Development Kit)
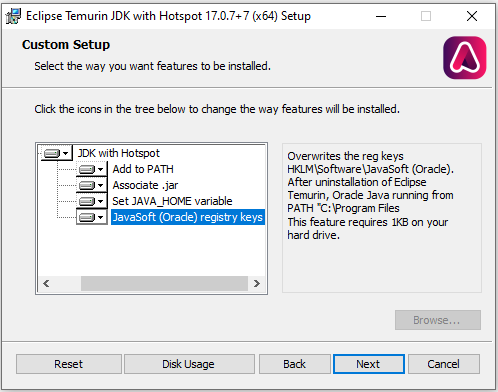
I follow the link on the page to the Java 17 installer (Windows).
Per the instructions, I also select the options to set JAVA_HOME and the Oracle registry keys:
Once the installation completes, I close the terminal, open a new one, and proceed to check the Java installation once more:
java -version # press enter

# output
openjdk version "17.0.7" 2023-04-18
OpenJDK Runtime Environment Temurin-17.0.7+7 (build 17.0.7+7)
OpenJDK 64-Bit Server VM Temurin-17.0.7+7 (build 17.0.7+7, mixed mode, sharing)
Everything reads as version 17 (including the JRE), so I move on to the next step of installing the launcher, again following the instructions:
download the Fabric Installer
.exefilerun the
.exefile and choose the latest version (1.19.4)- keep all other defaults
create a new folder for the launcher installation:
C:\myUser\fabric-minecraftopen Minecraft Launcher
go to the 'Installations' tab
find the launcher installation
press the '...' button
select 'Edit'
change the 'Game Directory' from the default location to the folder from the step above
press 'Save'
back on the main screen, press 'Play' so that Minecraft installs in that folder
- this step will also add the
/modsfolder to the folder you selected for installation
- this step will also add the
close Minecraft
download the Fabric API
place the Fabric API
.jarfile inC:\myUser\fabric-minecraft\modsdownload the Mod Menu mod (so we can make sure mods can load)
place it in the
\fabric-minecraft\modsfolderopen Minecraft and confirm you now have the 'Mods' menu on the home screen
So, what did we just do?
We just created a custom version of Minecraft that enables modifications (mods).
The Fabric API itself is a mod. We can think of it as the "parent mod", "controller mod", etc. -- basically, we need the Fabric API mod for the other mods to run against. When you drop a mod into the /mods folder, it must be a mod that is supported by the Fabric API (or one you developed using the Fabric API).
Fabric Server
At this point, you might wonder what we need a server for. We already have a version of Minecraft where we can install mods, so what role does the server play?
One use case for a server is to play multiplayer with mods. Think about it -- let's say we download and install a few more mods, and we want to use those mods to play with friends online.
Right now, we don't have a way of doing that without joining an existing server that someone else created. When you play Single Player mode, it uses the Minecraft code (along with any mods) that lives on your computer's hard drive.
To play Multiplayer with mods, we need to load the Minecraft code from a hard drive that our friends can access, too -- a hard drive that is accessible either via a local or public network.
And for that, we need a server.
A Fabric server takes the same concept as the Fabric Launcher and puts it into the context of a server. This way, your friends can connect to that server and enjoy the mods that you've installed in the server's /mods folder.
But... wait a second, we're interested in making mods, not playing multiplayer -- why are we talking about this?
I just wanted to drive home the concept of what a Minecraft server is and what it does. Now that we understand that, we can move on to a more relevant use case for a server -- a development server!
When we write code to modify Minecraft, we need to test to make sure the code works the way we expect when the game is running; that's what a development server allows us to do. We're connecting a server whose sole purpose is for testing our mod code. Since it's just for testing and development, the development server is run from your local machine.
There's no need for the development server once you're done developing your mod.
Let's pretend that we want to code a mod that we eventually play with friends; here's what that might look like:
install an instance of Minecraft locally via the Fabric Launcher (we did this in the last step)
set up our development environment for Java in VS Code
spin up a local development server that has the Fabric API running on it
set up a network-accessible server that has the Fabric API running on it
develop our mod against the local Fabric development server
once we're finished with the mod, it will exist in a
.jarfilewe can test the finished mod in single-player by putting that
.jarfile into our/modsfolder within our Fabric Launcher installationwe decide the mod is ready for prime time, and copy the
.jarfile into the/modsfolder on our network-accessible Fabric serverour friends connect to the server and play our mod
We've already installed the local Minecraft instance with the Fabric Launcher. The next step is to set up our development environment in VS Code.
Let's get into it!
Development Environment
This guide will cover how to set up your development environment for VS Code. If you're using something else, you can find instructions on the Fabric wiki .
Your development environment needs to be on the computer where Minecraft is installed. This is because running the Java project in VS Code (or whatever you're using) opens the Minecraft client. The Minecraft client then interacts with the development server so that you can test the current state of your mod.
A note on WSL
If you're not a Windows user (or don't use WSL), you can skip ahead to the next section. If you're a Windows user that normally develops in WSL (like me), you'll need to use plain old Windows for your development environment -- not WSL.
I came to this conclusion after many hours of troubleshooting. I never found an official answer to validate my assumptions, but what I gather is this:
When you run your mod's Java project, VS Code opens up Minecraft and temporarily loads your mod into the game so you can test it. For VS Code to be able to do that, it needs to be able to "see" where Minecraft is installed on your computer.
Even though the Windows file system can be accessed via WSL, Microsoft doesn't recommend cross-communication between the two systems. They're meant to be used independently. Because of this, you'll get errors if you try and run the Java project from WSL (since Minecraft is installed on the Windows filesystem).
For this same reason, if you're running your (non-development) Fabric server locally, you'll want to run the server from within Windows and not WSL. This is because Windows can't "see" that there is a server running on WSL (unless you're running the server in a Docker container). The blog post on running a Minecraft server should provide some more context.
Setting up VS Code
In this section, we download an example mod template and make the necessary setup and configuration changes that allow us to run the mod from VS Code.
We start by following the 'Manual Steps' on the wiki
(I'm doing this from a Powershell prompt on Windows):
go to the example mod git repo
clone the repo
change into the repo directory we just cloned
cd fabric-example-mod
open the repo in VS Code
code .(there is a space between the wordcodeand the period)
delete the
LICENSEandREADME.mdfiles
Before we start developing, we need to make sure VS Code is set up for Java by installing the necessary extensions.
Go ahead and install the extensions. You may need to reload VS Code once they are finished installing for the changes to take effect.
You might see an error like the one below, but we'll fix that shortly:
The supplied phased action failed with an exception.
A problem occurred configuring root project 'fabric-example-mod'.
Failed to setup Minecraft, java.nio.file.ClosedFileSystemException: null
Before we address the error, let's modify the mappings in our gradle.properties file. Fabric helps us out by providing the values on this page.
The instructions say we also need to edit the maven_group and archives_base_name properties in our gradle.properties file. These settings are related to how a mod is packaged, versioned, and distributed. Since we're not publishing a mod, and we're only concerned with the fundamentals of how to make a mod in this guide, we're not going to concern ourselves with these settings for now.
In other words, just put something there. Here's what my file looks like:
# gradle.properties

# Done to increase the memory available to gradle.
org.gradle.jvmargs=-Xmx1G
org.gradle.parallel=true

# Fabric Properties
# check these on https://fabricmc.net/develop
minecraft_version=1.19.4
yarn_mappings=1.19.4+build.2
loader_version=0.14.19

# Mod Properties
mod_version = 1.0.0
maven_group = sharif.sharif.test.mod
archives_base_name = sharif-test-mod

# Dependencies
fabric_version=0.82.0+1.19.4
After saving the file, this message appears in the corner of VS Code. Press 'Yes':
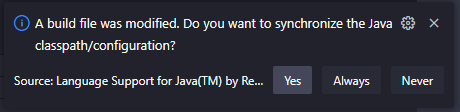
We then see this message in the 'Problems' tab of the VS Code terminal area:

Now we can address the error.
If we look at Fabric's VS Code Setup documentation, it tells us that we need to run the vscode task.
./gradlew vscode
Once this command runs, the error should go away (close and re-open VS Code if it doesn't). The error was because we hadn't run the Gradle configuration that was specific to VS Code.
Now we should be able to run the following command without any issues:
./gradlew --stop # press enter
./gradlew # press enter

# the script runs for a bit, then gives the following message when finished
BUILD SUCCESSFUL in 12s
1 actionable task: 1 executed
If ./gradlew fails and your'e on Windows, you may just need to run ./gradlew.bat. If it fails and you're not on Windows, it's probably a problem with your JAVA_HOME environment variable.
Now we're ready to generate the Minecraft source code
./gradlew -- stop # just in case
./gradlew genSources # this will run for awhile
When we ran the genSources command, it downloaded the Minecraft source code onto our computer. We'll dig into that a bit more in a later section.
For now, we're finally able to run the project to see if it works. To do that, either press Ctrl + F5, or go to Run -> Run Without Debugging in VS Code.
You'll see some output in the terminal, and then Minecraft should open up.
Alright, so we've run the build, but how do we actually make a mod?!
Patience, young Glow Squid; we do that next.
Making Modifications
The moment we've all been waiting for!
Below, we add a new item to the game by following the tutorial provided by the Fabric wiki.
Adding an Item
This section is merely a more detailed version of the instructions for adding an item to the game.
open our
ExampleMod.javafilecan press
Ctrl + Pand search for 'Example'or navigate directly:
/src/main/java/net/fabricmc/example/ExampleMod.java
Once we make the suggested changes to the file, it looks like this:
package net.fabricmc.example;

import org.slf4j.Logger;
import org.slf4j.LoggerFactory;

import net.fabricmc.api.ModInitializer;
import net.fabricmc.fabric.api.item.v1.FabricItemSettings;
import net.minecraft.item.Item;
import net.minecraft.registry.Registries;
import net.minecraft.registry.Registry;
import net.minecraft.util.Identifier;

public class ExampleMod implements ModInitializer {

    public static final Logger LOGGER = LoggerFactory.getLogger("modid");

    // an instance of our new item
    public static final Item CUSTOM_ITEM = new Item(new FabricItemSettings());

    @Override
    public void onInitialize() {

        LOGGER.info("Hello Fabric world!");
        Registry.register(Registries.ITEM, new Identifier("tutorial", "custom_item"), CUSTOM_ITEM);

    }
}
Now we can go to the 'Run' menu in VS Code and select 'Run without Debugging' again.
Once the game loads, we enter singleplayer mode and type the following command (type the / key to bring up the in-game chat):
/give @s tutorial:custom_item
You should see the item appear in your player's hand and inventory!
If you want to do more things with the new item, like add a new texture to the item, trigger sounds with the item, etc., go ahead and continue with the instructions on the Fabric wiki. For the scope of this blog post, we're only interested in the fact that we were able to successfully make a mod.
Getting your mod into a .jar file
Now that we've made a mod, we want to be able to use it in an actual instance of Minecraft, not just the sandboxed world that we get when we run the mod in VS Code.
All mods (including Fabric itself) are packaged in a .jar file. That means we need to get our mod into a .jar file.
To do that, we need to run the 'build' task:
in VS Code, right-click on the
build.gradlefileselect 'Show Gradle Tasks'
run the 'build' task
build is output to
build/libsthe file you want is the one without
-sourcesin the filename
Now that our mod is nicely packaged into that .jar file, we're ready to put it in the /mods folder.
if using the mod in single-player mode, this refers to the
/modsfolder within the installation directory of the Fabric installation we set up in the Fabric Launcher (Client) section above- if you installed the Mod Menu mod in that section, you can use the 'open mods folder' button that is available from the Mod Menu interface
if using the mod on a server, this refers to the
/modsdirectory on the serverthe way this directory is accessed varies depending on how the server is set up
more info in Running a Minecraft Server
Once your .jar file is in its appropriate /mods folder, we're ready to test it out:
create a new world with cheats enabled (so that we can use commands)
run the
/givecommand that we ran earlier when we were in our development environment/give @s tutorial:custom_item
If you look at the Mod Menu interface after copying your .jar file to the /mods folder, you will have noticed that the mod still has all of the default tutorial values -- the name, thumbnail and descriptions are all generic.
A good way to get comfortable with the structure of a Fabric project is to try and change all of these values to something of your choosing, then re-install the mod with your new changes.
Other Ways to Modify Minecraft
Now that we've successfully created a Minecraft mod, I think it's important to understand how that fits into the bigger picture of the modding paradigm.
We can think of a modding framework like Fabric as having many layers. We make changes at whatever layer is appropriate for the mod in question. More complex mods require making changes at deeper layers.
To better understand these layers, take a look at the Introduction to Modding page in the wiki.
The recommended approach is to start at the outer layer (Native Minecraft APIs), and only move to the next layer if the current layer doesn't meet your needs.
For example, the item we created in the last section made use of the Registry, a Native Minecraft API.
The wiki does a better job than I can at explaining most of the other layers, but I do want to call attention to Mixins because it draws on some fundamental Java knowledge that you may not already be equipped with.
Mixins
If you looked at the wiki, you will have seen that Mixins are the innermost layer of the modding framework, and that Mixins allow the Minecraft source code to be changed.
I wanted to bring this up because it ties back into the genSources command we ran earlier when setting up our development environment in VS Code. The genSources command downloads the Minecraft source code onto our computer so that we can view it (see FAQ here).
Before Mixins were a thing, the source code needed to be modified directly. As you might imagine, this can lead to problems. Thus, Mixins were created as a layer of abstraction so that the source code could be modified more safely and predictably.
Since we don't need to modify the source code directly, reading the source code isn't as critical as it was before Mixins came along, but it's still good to know how everything works behind the scenes.
Bytecode
Before we get into viewing the bytecode, it's important to understand what bytecode is.
Bytecode is what allows Java to run on any platform, by way of the JVM (Java Virtual Machine); it's an intermediary step between a .java file and binary. Java bytecode is represented by a .class file.
For example, if we have a .java file on our Windows machine, and we want to share it with someone on MacOS, simply giving them the .java file won't work because it's a different operating system and therefore processes .java files differently.
This is where the JVM comes into play.
Windows, MacOS, and Linux all have their own OS-specific versions of the JVM. So if we go back to our scenario, but this time make use of the JVM, it looks something like this:
we have a
.javafile on our Windows machinethe JVM converts our
.javafile to a.class(bytecode) filewe share the
.classfile with someone on MacOS- Java is installed on the Mac
because Java is installed, the Mac can use the Mac version of the JVM to convert the
.classfile into binary code that MacOS understands
Again, you probably won't need to dig into bytecode, even if you do need to make modifications at the Mixin level, but you never know when it might come in handy.
By default, VS Code is not set up to view bytecode, but it can be enabled with an extension.
Closing thoughts
I'm aware that this blog post probably seemed like a whole lot of talking and setup, and not a lot of modding -- that was kind of the point. The setup and theory behind Minecraft mods were what I found to be the most challenging and elusive, and so that's what I've covered.
I may create more blog posts in the future that dive deeper into the details of the code, but the purpose of this blog post was to build a foundation and get you started.
Speaking of building a foundation, there was a lot of information that I couldn't logically fit into this blog post, so I've broken that info out into separate posts:
These links are also included in the Resources section below.